
Tags
1/6 scale, Etsy, miniature food, Miniature Turkey, Miniatures, Polymer Clay, sculpting miniatures
Switch to stereotypical Valley Girl voice: “It’s been, like, for-ever since I posted! Like, that’s sooooo totally not cool.” So, does anyone under the age of 30 even comprehend the term “Valley Girl”? LOL Anyway…you may now switch back to normal speech mode.
I apologize for my OSSome Blog absence. A lot was going on in TRW (The Real World for new readers), but then, there usually is a lot going on in my life and yours, so that’s not really a very good excuse. I must admit that I have also been struggling with finding a suitable topic for public consumption. I often struggle with that as I just cannot seem to wrap my mind around the fact that anyone cares even a little bit about what I have to say. I have pieces and parts for several posts, but pieces and parts do not a decent post make. However, with Autumn officially here and thoughts turning toward the holidays and roast beasts, I have managed to complete something I personally deem worthy of an OSSome Blog post. I hope you agree.
Since most folks consume turkey for Thanksgiving and/or Christmas, I decided I’d sculpt some 1:6 scale, roasted turkeys for the OSS Etsy Store. A friend asked if I could also create one with a couple of slices missing as if it was undergoing the carving process. I just love a challenge! Of course, as is my method, I did copious amounts of research online and in TRW. I have to admit, I have never really LOOKED at a roasted turkey. I have purchased gobblers, thawed them, prepped them, stuffed them, cooked them, and, to my delight, eaten them. But, I have never really paid that much attention to how the bird is built. I know more now. But I’m no expert, and I won’t claim my polymer clay birds are anatomic perfection, but they suit me, and I hope they suit you.
Step 1: OSS Turkey Platters (Click on Photos to Enlarge)
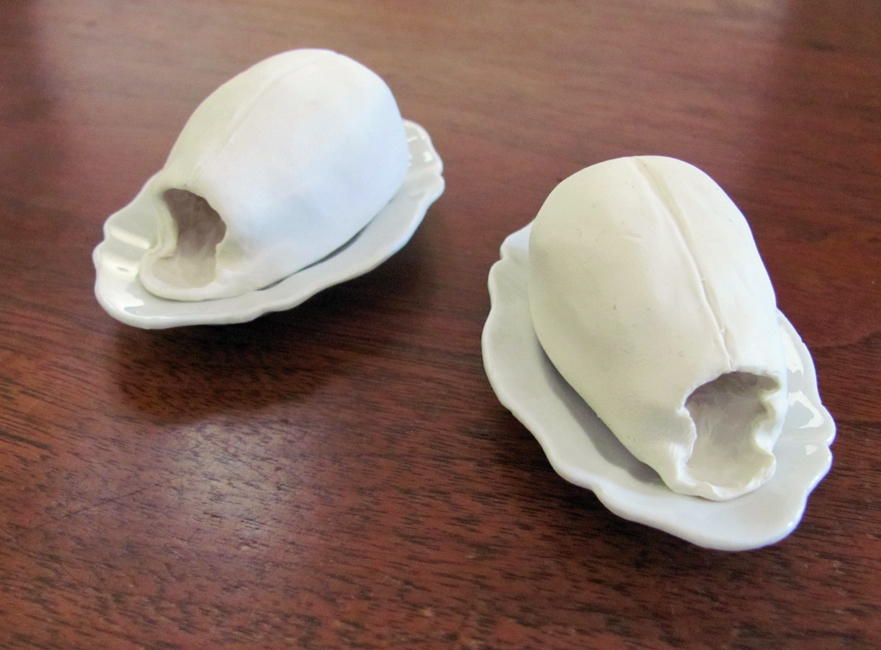
Having figured out my starting point and knowing that at least one bird would be carved into, I settled on a clay blend of translucent, white, yellow, and tan. I roughed out the main body shape and hollowed the cavity. In inventory were two ceramic ovals and two ceramic rounds. The first two turkeys landed on the ovals. It wasn’t necessary to hollow out the bodies, but I like to do it as it encourages even baking and less weight. The next step involved adding the drumsticks and wings. It isn’t a matter of sculpting the appendages and then simply gluing them to the existing

Step 2: Adding Wings and Drumsticks
body with liquid clay. While I had formed the general shape of the bird, it took a couple of hours to sculpt the wings and drumsticks and then carve out the areas on the bodies where the parts would attach. I didn’t want them to sit on the outside of the body, I wanted each appendage to be cupped by the clay flesh and then look like the skin was holding them together. This meant carving out the clay to form the cup and then sculpting the skin back over the added parts. It seems like a lot of effort when I could have created a half of a drumstick and then glued it on, but when it comes to my art, I’m nothing if not obsessive about the details.

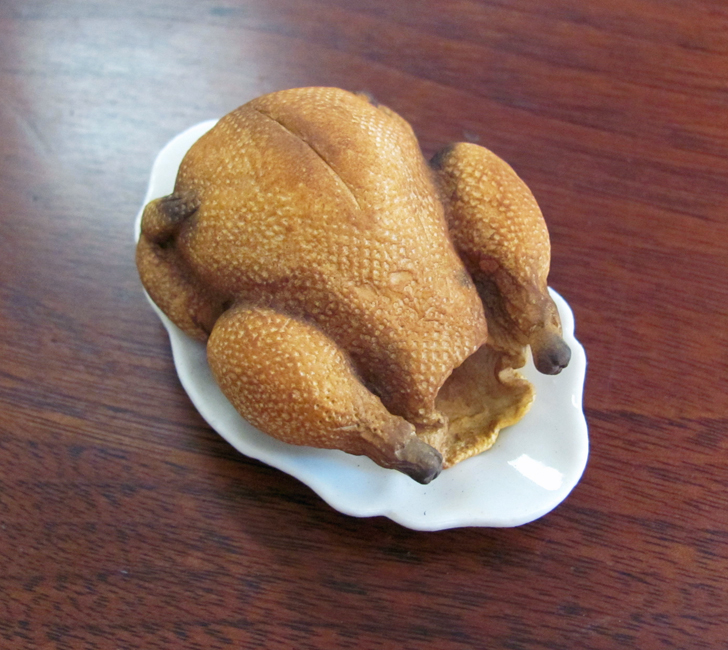
Step 3: After the fussing, add the texture.
The next step followed another hour of fussing with the birds. When you sculpt with polymer clay, every time you touch it, it makes a mark. Sometimes, you want the mark; sometimes you don’t. Detailed pieces take time and lots and lots of fussing. In the world of OSS, that’s true even if my husband thinks I am insane. Once I was satisfied with the shape of the birds, it was time to texture them. I love this part! It’s so fun to see something take on a realistic appearance. I used the handle of one of my sculpting tools to roll on the stippling of the skin to approximate the look of where the feathers had been attached. I also used a stencil brush and a toothbrush to “pound on” some texture. A toothpick was used to reach the areas the brushes could not. Even though I knew that a lot of those places weren’t going to be visible at the far end of the project, I had to texture them. That’s more of my insanity rearing its head.
Step 4: Adding Color!
Another fun part of the process for me is adding the color to the piece with soft brushes and chalk pastels. This has to be done prior to baking. And it brings the item to life, in my opinion. But wait…that’s not the end of it! It is, however, time to bake the bird!
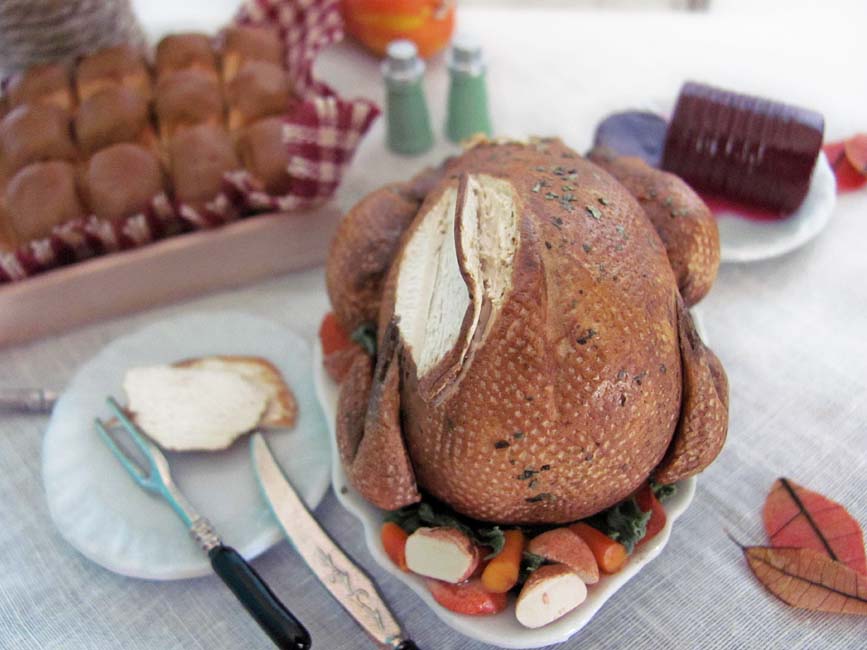
After baking and cooling, I affixed the birds to their platters with liquid clay after which I added stuffing, assorted vegetables, and garnishes (more time, more fussing). And then it was back into the oven for the final baking session! Once baked and cooled again, I used acrylics to add more shading and details. I also added teensy weensy crushed herbs to the top of each roasted bird and then sealed them up. Oh…and don’t forget, if you want the carved version, you’ll have to do that before the first baking. Once polymer clay is baked, there’s no going back. You have to think several steps ahead when sculpting miniature food. And here’s a shot of the finished bird. Gobble! Gobble! And then put on your sweats. LOL
P.S. I’ll post another photo or two of the birds when I have them ready to go into the OSS Etsy Store. The two on the oval platters are already sold! Thank you!
1:6 Scale Carved Turkey Miniature by OSS

Love! It looks fabulous, as I knew it would!
Thanks! I just finished baking the whole one. Will add details and “fuss” more tomorrow. 🙂
Love, love your “insanity”, Dawn!! 🙂 VERY nice!! Good job!!
heeheeeeeeee Thank you!
Like, OMG! These are AMAZING!
Like, thank you! LOL
wow, so amazing and I am sure this took longer than the actual cooking of a whole turkey dinner with fixins, what visions you have.!!
Thank you! Yes, I don’t obsess over the real deal. Only my minis get that much time and attention. I have to admit it is a bit crazy, but oh, well… LOL
This is truly Perfect! This is also the reason why I don’t own a doll kitchen…I don’t think my girls would even step foot in the kitchen…LOL.
LOL Well…you know DASHA doesn’t spend any more time in the OSS kitchens than absolutely necessary! Thanks for stopping by!